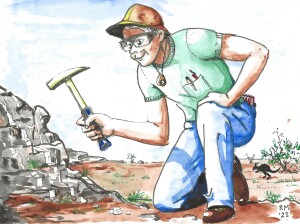
This post is about the different techniques used by explorationists to collect samples for assay from exposed bedrock – a process known generically as rock chip sampling.
Explorationists seek to find new ore bodies. Ore bodies that reach or approach the surface are the easiest to find, but the world is big, ore bodies are small and “easiest” is a relative term: the really easy ones, we can be reasonably certain, were found a long time ago.
But explorers are aided in their search by two factors:
- Although metallic ore bodies may be small, they are the result of large scale and long-continued earth processes (faulting, fluid movement, sedimentation etc..) that almost certainly have left their mark through a volume of rock that is larger than the associated metal concentration that is of interest to miners.
- Metals are mobile in the near surface environment as a result of mechanical and chemical weathering. These processes can distribute a halo of low metal concentration around or adjacent to the primary concentration.
Because of these two factors, ore bodies at or near surface typically have a large chemical “footprint” that can provide a pathway to ore discovery. The art of geochemistry is to take samples from the surface environment and assay them for the presence of elements that might reveal that footprint and, hopefully, a vector to the metal concentration. The range of media which geochemists can sample is wide and wonderful: from in-situ soils to alluvial silt; regoliths of all kinds; coarse pebble floaters to panned heavy mineral concentrate; calcrete and ferricrete; leaf litter and termite mounds. Orientation surveys are needed to decide the most suitable of these techniques.
But if there is fresh bedrock at surface – either as natural outcrop or exposed in artificial openings such as trenches, or mines – then sampling the actual rock itself is always the most direct route to ore.
Three main techniques are used to collect the sample: chip sampling, chip-channel sampling and sawn-channel sampling.
CHIP SAMPLING
This technique is used by the prospector who does not have much time to spend on the outcrop. He or she simply seeks to determine if there are any interesting metal values in the exposed rocks. The sample is generally not intended to be representative of all the exposed rocks in the area. Rather the geologist attempts to high-grade her sample, deliberately biasing it by including only these chips that appear to have the best chance of containing the element sought. Thus if the target is gold, quartz fragments will figure prominently amongst the chips collected. If the target is base metal (or if gold is associated with base metal, as it often is) then the sample will be over-weighted with fragments showing evidence of sulphide content (i.e. gossanous). The idea is to maximise the chance of finding something interesting, even although mineralised rocks might constitute a minor part of the exposure. If the assays for the sample show elevated numbers – even if only in trace amounts – the geologist relies on returning to the outcrop to conduct a more detailed, representative sampling using one of the other sampling methods detailed below.
The chip sample consists of a number of small rock fragments collected over a limited area – perhaps 10 – 50 square meters. Over this area, 20-30 small chips are broken off the outcrop with a geology hammer and composited into one sample weighing around 3kg. The sample is collected in a coarse cotton sample sack which can be sealed by tying at the top (see figure). A fabric bag is used because a plastic bag would likely be pierced by any sharp edges amongst the rock chips. The sample bag is labelled with an identifying number written onto the outside of the bag with a permanent marker pen. That number corresponds to the number in a pre-printed sample book on which details of the sample (GPS coordinates, type of sample, rock description etc..) can be recorded. A numbered tear-off tag from the sample book is placed with the rock chips inside the sack. It is also good practice to mark on the ground the centre of the sampling site by means of plastic flagging tape and/or a metal tag nailed to a tree. These ground markers should also bear the sample number.
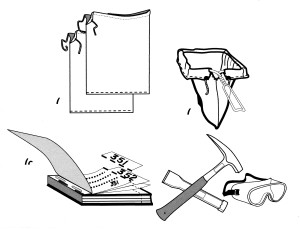
Cloth sample bags with draw-string tops (top left diagram) are used to collect rock chip samples. A simple wire frame (top right) can be made to hold open the top of the sample bag so that it can be used one-handed as a catcher for chips hammered off the outcrop. A sample book (bottom right) with pre-printed numbers should be used to allocate the sample number and record details of the sample such as location coordinates, type of sample, lithology etc… A duplicate numbered tag can torn off and added to the sample in the bag. Sampling tools (bottom right) consist of a geologist’s hammer, chisel and eye protection.
Always wear safety goggles when breaking off rock samples with a hammer
A chip-channel sample is taken when a mineralised, or potentially-mineralised, zone can be identified in the exposed rock. The sample attempts to define the approximate width and grade of the zone and the rocks immediately adjacent to it. Although the sample will be much more accurate and representative than the high-graded chip sample described above, it still provides only an approximate measure of the true width and grade of the zone. No one should ever use the assay results from a chip channel sample as the basis for a company announcement or prospectus (although this has been done – just Google “rock chip sample” for an egregious list of examples). No one should ever use a chip sample samples as the input to an ore reserve calculation (this has been done too). But with these reservations, positive results from chip-channel sampling provide the confidence to proceed to the next exploration stage: drill testing.
The sample consists of a number of small contiguous rock chips broken from the rock along an approximate straight line[1], or channel, across the zone of interest. The chips are composited into one sample (3-5kg) representing the width of the mineralised zone. However composited samples should not normally cover more than 1-2 meter of channel. If the zone is wider than that, a number of adjacent samples will be needed. Extra channel samples should be taken for the country rock immediately adjacent both sides of the zone of interest. Where possible, the boundaries of individual channel samples should correspond to lithology contacts.
Rock chips are collected with a geologist’s hammer and chisel (warning, wear eye protection, see above!). For very hard rocks the use of a jack hammer has been found useful (see figure below). For field use, small electric jack hammers that can be powered by a portable generator are available.
All chips taken along the line of the channel should be approximately of the same size; over breaks need to be split separately so that only the required size portion goes into the sample bag. Care needs to be taken that all rocks along the channel are sampled equally[2]. Care needs to be taken NOT to fill the sample bag with soft easily-broken material (all too easy to do) and NOT to under-sample hard rocks[3] that are difficult to break free.
Normally a number of separate parallel channels across the mineralised zone are taken: the more the better depending on the extent of mineralisation and the time available. The chip-channels should be oriented at right angles to the boundaries of the zone of interest (assuming it is tabular). If the zone is flat-lying (a vein, or array of veins, for example) and exposed on a vertical face (the wall of a mine opening) the channel samples must be vertical. If the zone is steep dipping, then horizontal channels across it are indicated.
The samples are bagged and labelled as described for the chip samples in the section above.
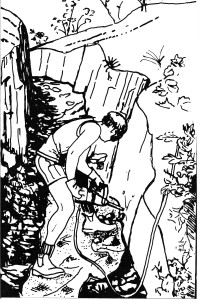
A field assistant is collecting a chip-channel sample from a trench wall. The sampler is using a small electric jack-hammer powered by a portable generator. The broken rock falls onto a tarpaulin laid along the trench floor. The same technique could be used for chip-channel sampling any hard rock exposure in the field or in a mine. ( Note the sampler wears goggles and gloves, but for even better safety, he would have been advised to wear more substantial clothing.)
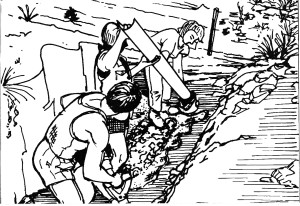
Splitting a sample for assay from an even row of small rock fragments on the ground. The rock chips lie on a tarpaulin: a halved length of 100mm poly pipe is laid along the row and rocks and pipe are rolled together in the tarpaulin. Rock chips collected in the pipe constitute a split of the larger sample and can be easily slid into a sample bag.
SAWN-ROCK CHANNEL SAMPLING
This is the most accurate, objective and reliable way of determining the width and grade of outcropping mineralisation. It is also the slowest and physically hardest way to collect a rock sample. Such samples will normally be collected in a mine environment (or exploration trenches and costeans) were continuous exposure of fresh rock is exposed on accessible, approximately-flat, faces. Results from carefully collected sawn-rock channel samples have the same status as assays obtained from diamond core drilling, and can be used as an input to ore reserve calculations or the basis for company public announcements.
As with chip-channel sampling, the sample is collected from a continuous channel across the width of the mineralised zone. A rock saw (see figure below)[4] is used to cut the channel and free the sample which is then collected into a sample bag. Mineralisation widths over 1 meter will require several adjacent samples. Once again, immediate wall rocks to the mineralisation will normally also be sampled to confirm the limits to ore. In soft rocks such as sedimentary lithologies, a skilled operator can expect to cut a channel of up to 10m in one hour. In very hard rocks such as quartz an hour might only suffice for 1-2 meters.
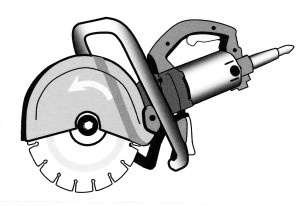 An electric powered rock saw (this is a Hitachi model, sold as a “concrete saw”) with diamond impregnated blade capable of sawing at least 100mm into hard rock.
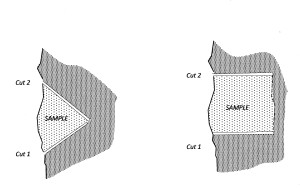
There are two methods of cutting the sample. In Method 1 (left-hand figure, below), two angled cuts are made which intersect in a “V” thus freeing a wedge-shaped sample (see figure). This method will yield a sample of around 5 kg for each meter of advance and is the quickest method. However, in practice, it is quite difficult to make cuts oriented at 45° to the operator’s body, and correctly angling two cuts so as to intersect is not always possible, necessitating the frequent use of a chisel to free the sample.
A better method – Method 2 (right-hand figure, below) – is to make two parallel cuts about 100cm apart and then, in a separate operation, use a chisel to break the sample free from between the cuts. This method will normally yield 8-10 kg of sample for each meter advance.
[1] It is often necessary to deviate from a straight line in order to break off suitable chips for the sample. Sometimes the same sample can be continued along an adjacent parallel line positioned a few cms to a meter away along strike.
[2] In practice, this is an impossible ideal, but every effort must be made to approach this ideal.
[3]Soft zones may be fault gouge or hypogene or supergene argillic alteration: hard rocks might be quartz veins or siliceous zones – the very lithologies that are likely to contain greater or lesser amounts of the metal sought. You do not want to over or under sample such outliers.
[4] A rock saw (the tool catalogues generally call it a concrete saw) is a hand-operated tool with a rotating diamond tipped blade that can make a cut in hard rock up to 10cm deep. Some models are powered by electricity, some by a small two-stroke petrol engine (the former is lighter, quieter and easier to handle).
