Summary
Measuring the attitude of structures in drill core requires fully oriented core. But the tools for orienting core that are currently available to drillers often fail, especially with small core diameters (NQ or less) and where the rock has fissile surfaces within it. As these failures are not always apparent at point of core recovery, geologists can make incorrect measurements which are then entered to data bases and become input for computer programs.
This post details how these failures can occur and outlines stereographic techniques which enables these problems to be identified and quantified.
How geologists measure Structure in Oriented Drill Core
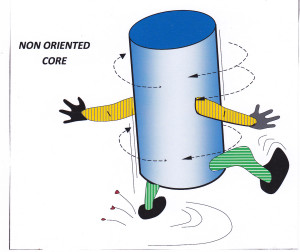
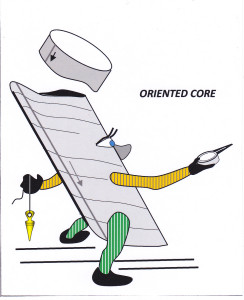
The difference between oriented and non-oriented core is graphically illustrated below.
Figure 1: Although the orientation of the core axis may be known, the core has rotated by an unknown amount around that axis. RM, 2015.
Figure 2: The core is now fully oriented in 3D space. RM 2015
The most common type of geological structures measured in oriented drill core are planar (bedding, cleavage, veins, joints etc.). Assuming that the core has been correctly oriented (more on this assumption below), the best way to do this – one that produces fewest errors and creates the greatest geological understanding, is by using a geologists’ compass to directly measure structure in core pieces that have been set up in their original orientation by means of a Core Orientation Frame (for further discussion on this subject see my blog post HERE). However, no doubt because it is quick, easy and involves minimal mental involvement, it is my experience that most geologists today measure and record the attitude of planes in oriented core by the Internal Core Angles Method. This technique involves measuring the angles which the structure makes with lines of known orientation in the core. These lines are the Core Axis (known from a down-hole survey) and the Bottom of Hole line (provided by the driller using a core orientation tool). These angles are:
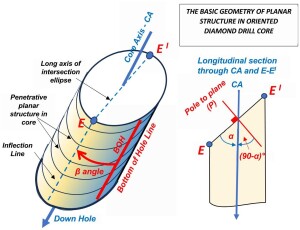
Alpha (α) – the acute angle (0°-90°) between the core axis (CA) and the long axis of the intersection ellipse (E-EI) defined by the trace of the planar structure on the cylindrical core surface. See figure 3.
Beta (β) – the radial angle (0°– 360°) measured in a clockwise direction about the core circumference from the Bottom of Hole Line (BOH) to the down-hole end of the intersection ellipse. Clockwise is determined looking down the axis of the core. See figure 3. Note that in holes drilled below the horizontal (all holes drilled from the surface) the down direction points away from the hole collar. In holes drilled above the horizontal (some underground holes) the down direction will point towards the collar.
Alpha and beta measurements numbers are then subsequently crunched by computer, along with surveyed hole orientation data, to produce a standard strike and dip (or dip and dip direction) measurement, which can then be displayed as a stereonet plot, a histogram or as short lines of intersection on a drill section. It is also relatively easy to do this manually by using a stereonet (for details, see my blog post HERE)
Figure 3: The angles which define the orientation of a planar structure in oriented drill core. Click for sharper image.
Potential Errors in Measuring Alpha and Beta
Measuring alpha is quick and easy using any standard protractor. The core does not need to be oriented. You do not need to know which end of the piece of core points up the hole and which points down. All values of alpha from 0 to 90 degrees can be measured with the same level of accuracy. Where the planar structure is well defined and reasonable care is taken by the geologist, measured alpha angles can usually be taken as accurate to at least +/- 2°. Alphas numbers are seldom a source of error in computer input.
Errors in measuring beta angles cause most of the errors when using the internal core angles method.
These errors occur in two areas:
a. In identifying point E
The trace of any planar structure on cylindrical core is an ellipse. The long axis of the ellipse defines points E and E I on the core surface, where E points down hole and E I points up hole (see figure 3, above). E and E I are recognised as inflection points (points of maximum curvature) on the trace of the plane. Where the alpha angle (the acute angle that E-E I makes with the core axis) is low, the resulting intersection ellipse is elongate, with sharp inflection points easily defined by eye. However, with increasing alpha angle, the ellipse becomes fatter and tends towards circularity until, at alpha = 90°, the “ellipse” is a circle with no definable axes. As alpha increases, inflection points become broader and harder to accurately define and errors in correctly locating point E increase. Since measurement of the beta angle is dependent on being able to define point E, high alpha angles can lead to significant beta measurement error. For all alpha angles over 65°, I recommend that a core frame be used to measure structure in core rather than the alpha/beta method. But in my experience, very few geologists taking structural measurements in oriented core do this.
b. In the BOH mark placed on the core by the driller.
There are a variety of tools currently available to drillers for orienting core. I describe these tools and how they work, as well as the strengths and weaknesses of the various systems in another post HERE. The tools, although mostly reliable, are capable of producing grossly inaccurate results under some circumstances and it is not always easy for the driller or the geologist to know when this has occurred.
For the two reasons given above, mismeasurement of beta is overwhelmingly the major source of error when using the internal core angles method of measuring structure in oriented core.
Stereonet Validation
Once a set of measurements have been made on oriented drill core, there is a simple test to determine if inaccurate beta numbers are a significantly affecting your results (see Figure 6). Plot your dip and dip direction results from measured planes as poles on a stereonet. For a set of measurements through a volume of rock, the distribution of poles (see definition in section below) can enable deductions to be made about the accuracy of your measurements or whether or not they are made from approximately parallel surfaces. As a bonus, stereonet plotting of structural measurements can also enables useful geological interpretation of your results.
But first…
1. A quick Primer on the Stereonet…
A Stereonet is a pre-printed net of intersecting lines which allows the three-dimensional attitude of measured linear or planar rock structure to be shown as points on a two-dimensional graph. Linear structures (1D) such as fold axes, lineations or drill holes all plot as points on the net. Planar structures (2D) plot as great circles on the net, but their attitude can also be shown as a single point by plotting the line at right angles to that plane. This is called the Pole to the plane. A number of measurements of a planar structure that are plotted on the net as Poles is known as a Pole Figure.
The scales of the net then offer a quick and easy way to provide approximate solutions to problems in 3D geometry, in much the same way as the scales on a slide ruler allow numerical solutions to math problems. Cheap pocket calculators, which first appeared in the 1970’s, have now replaced slide rulers. Computer software can solve math problems in 3D geometry too, but as a cheap, quick, low-tech and always available tool, the stereonet still has a useful role to play in this area. In structural studies, approximate solutions (i.e., to the nearest few degrees) are usually all that can be expected and all that is required.
But an equally important role of a stereonet plot is to provide a graphical way of showing the spatial distribution patterns of a series of orientation measurements taken through a volume of rock. Our brains are analog computers, fine-tuned for recognizing visual patterns (sometimes too fine-tuned). Patterns of plotted points on a stereonet can thus be a great aid in the interpretation of underlying geological processes. But these patterns need to be distinguished from merely coincidental aggregations of random numbers or from the effects of systemic problems with data collection and input. I will show examples of all these effects. Thus, stereonet plots of structural measurements can be a powerful tool in validation of data.
2. Examples of stereonet Pole Figures for measured planes in outcrop or oriented drill core
Example 1
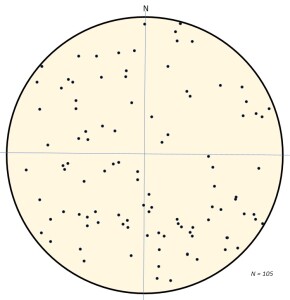
If your measurements of planar structure across an area or a through a volume of rocks are completely random, their stereonet pole figure might look something like that of figure 4, below, a plot constructed using a random number generator. You may see partial patterns of lines or circles or ellipses or clumping of points, but these are coincidental and have no meaning.
If you get a random distribution of points such as this from a real set of measurement, it most probably means that your measurements were collected across several distinct structural domains.
Solution: Identify the different structural domains. Group your measurements by domain and plot each group separately.
Figure 4: A stereonet plot of poles to bedding created using a random number generator. Any patterns or concentrations of points that a visual inspection might suggest are purely coincidental and have no real world meaning. If this was a real set of measurements across an area, then the most probable interpretation would be that the measurements were taken across several distinct structural domains.
Example 2
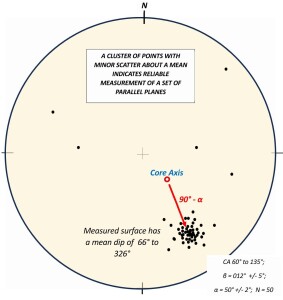
If your measurements are accurately made from a set of parallel, or approximately parallel, planar structures, then the majority of points on a pole figure will form a tight cluster, as shown in figure 5. If the measurements were from oriented drill core, then the centre of the pole cluster will lie at an angle of 90-α° to the plot of the core axis.
Q: What is the logic behind this number 90-α°?
A: This is a plot of poles to planes measured in oriented drill core. If you refer to figure 3, you will see the poles to these planes lie at 90-α° to the core axis (CA).
Figure 5: Poles to planes measured in oriented drill core by the internal core angles method. The orientation of the core axis is shown as a red circle. The results indicate the planes are approximately parallel with only minor, acceptable, error in both alpha and beta measurements. The centre of the pole cluster lies at 90-α° to the core axis. Click for a sharper image.
Example 3
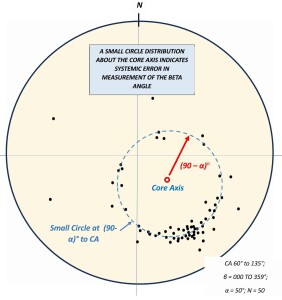
If you are plotting measurements from oriented drill core using the internal core angles method (alpha/beta), your measurements can be assumed accurate as regards to the alpha number but may be subject to random error in beta measurement (a not uncommon occurrence, especially when using electronic core-barrel orientation tools, see HERE). If this is the case. the pole figure plot will show a partial or complete distribution about a small circle at 90-α° to the core axis. There is no known geological process which will produce such a pattern. This pattern is shown in figure 6, below.
Solution: Try using a core-stub orientation system.
Figure 6: Poles to a set of planes measured in oriented drill core by the internal core angles method. The consistency of alpha indicates accurate measurement on planes that are approximately parallel. However, the scatter of points around a small circle at 90-alpha degrees to the core axis indicates that large random errors have been made in the measurement of beta. Click for a sharper image.
Example 4
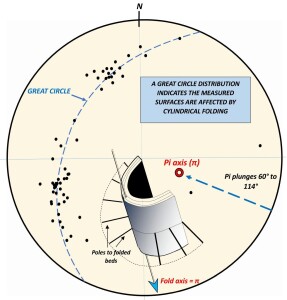
If the Pole Figure for of large number of orientation measurements taken from scattered surface outcrop or oriented drill core shows distribution about a great circle on the net (figure 7), we can draw several conclusions.
The results indicate accurate measurement of a set of approximately parallel surfaces.
Although the measurements show a wide range of orientation, these are distributed in a systematic way that shows they were taken from a geologically coherent structural domain – namely…
The measured planes have been affected by a cylindrical fold, or a set of parallel cylindrical folds (as illustrated by the insert on figure 7).
A line at 90° to the great circle distribution (which plots as a point in the opposite segment of the net) represents the trend and plunge of the fold axis or axes that are affecting the surfaces. This point is conventionally labelled pi (π).
The two weak bedding-plane maxima which can be seen on the great circle of figure 7 can be interpreted as the relatively planar limbs of the fold or folds. This is because random measurement across a volume of folded rocks will sample more examples of extensive fold limbs than restricted fold hinges. The two maxima further indicates that the fold or folds tend towards similar rather than concentric in style.
Figure 7: Poles (n=50) to a set of bedding planes measured across scattered surface outcrop or oriented drill core. The great circle distribution indicates folding about a cylindrical fold, or a set of parallel such folds. Click for a sharper image.
